


This system can revolutionize your approach to stability workouts and it delivers. Science based core chiropractor, Dr. Alexander Jimenez goes through the routines in this part I of a two part article.
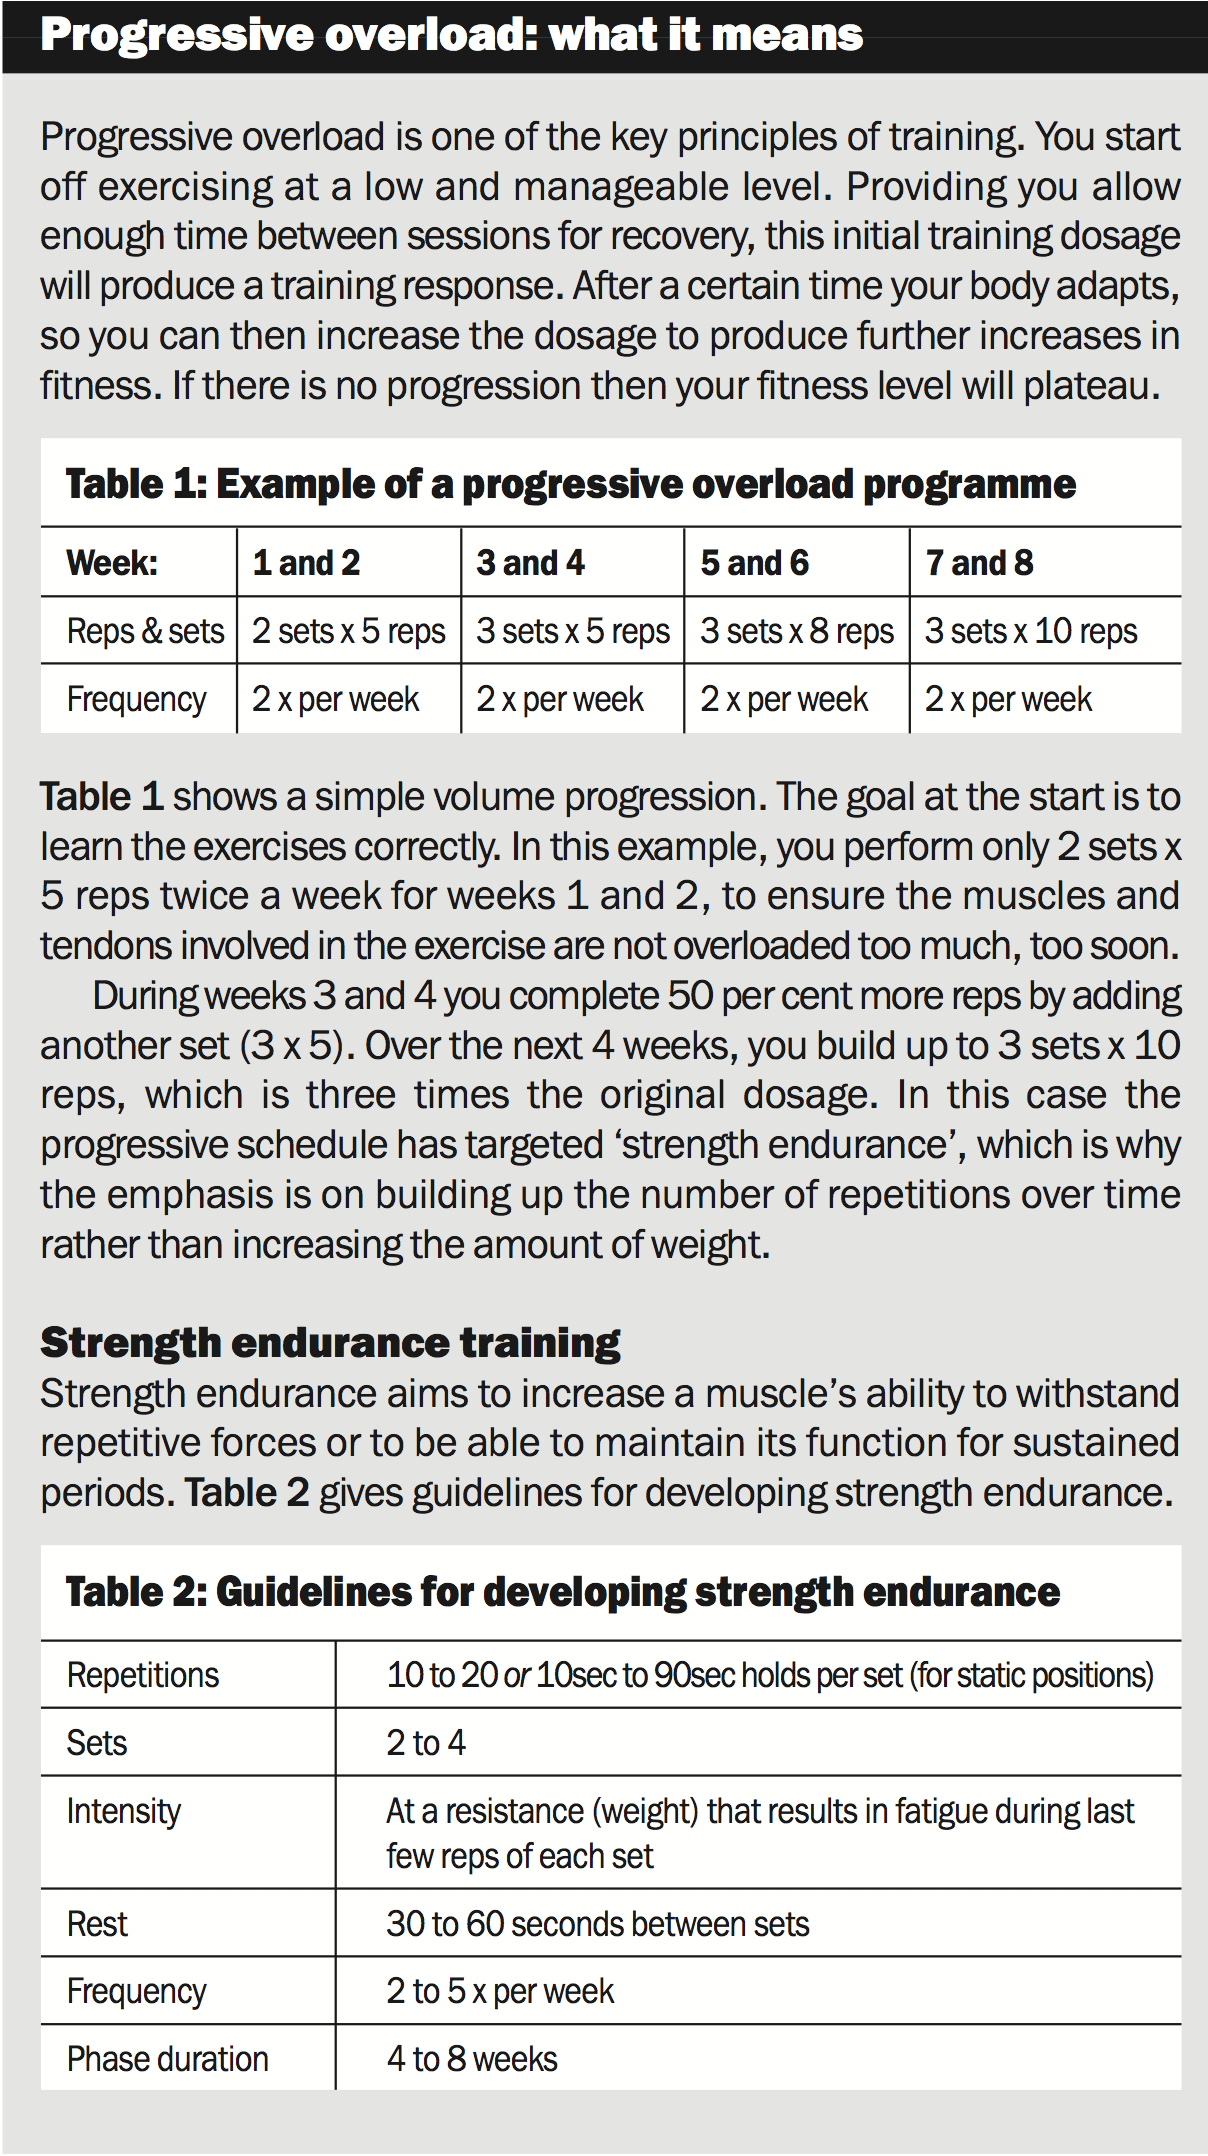
If you have ever had a sports injury involving damage to, for instance, your back, groin, hamstrings or knee, your sports therapist or physiotherapist will probably have given you some core stability exercises to do as part of your rehabilitation work. Within the repertoire of core stability there is a large range of exercises, the suitability of which will vary according to the injury and therapeutic needs of each individual.
There are three major groups of exercises:
- those focusing on getting the small deep-lying stabilizing muscles (such as the lower abdominals and deep spinal muscles) to work properly. These exercises are often taken from clinical Pilates
- static bodyweight exercises that concentrate on developing stability and/or strength endurance in certain postures. These need you to learn how simultaneously to work your small stabilizer muscles and the larger mobilizer muscles. One popular example is the ‘plank’
- traditional dynamic strength exercises for the main movement muscles of the trunk, often performed on the floor or Swiss ball.
While sports therapists utilize many different approaches, It's common to start you off working on the very first kind of exercise (how to use the smaller stability muscles properly) and then progress to more strength-based work as your injury improves.
Core stability work is by no means restricted to the rehabilitation clinic, nevertheless. Sports doctors, chiropractors and strength and conditioning coaches also recommend that their clients perform regular core stability or back strength exercises to prevent injury. The rationale for prophylactic instruction is that increased recruiting of the stabilizer muscles and increased intensity of the prime movers (principal movement muscles) will carry over into improved posture and more management, both in daily life and in athletic motions. So it's very likely you will have come across several core stability exercises throughout the regional gym, gym or some other general training context. The majority of us often have a list of three or four of these exercises which we include within our workouts each week.
While this 'pre-habilitative' strategy is well intentioned it has two limits. The first is behavioral. Core stability exercises can quite quickly become 'standardized equilibrium'! It requires self-discipline to do 20 to 30 minutes of the same exercises three or more times a week during a lengthy period, so many people lapse, or at greatest centering on this portion of the workout after a while.
The second limitation is physiological. The key coaching fundamentals of specificity and progression apply to core work in the same manner that they do to any other aspect of physical fitness. In my experience it is quite normal for an athlete to perform exactly the exact same core pattern on a long period and get very good at four or five moves or 'holds'. But instruct exactly the identical athlete a new core exercise and they'll find it difficult, simply because it is a new stimulation. The message is that progression and variety are crucial to optimizing benefits of a strengthening program.
The strategy of core coaching menus presented here targets to overcome the issues of non-compliance and lack of struggle, so as to offer a system in which an individual may adhere to a prophylactic or rehabilitative heart stability and strengthening program using a vast array of moves to maximize adaptations for advancement, and which muscle groups are targeted for training.
The system is designed for people who have already developed some fundamental ability in utilizing their all-important lower abdominal stability muscles (transversus abdominis) and who are familiar with several core exercises. This is a challenging program, covering all the back and pelvic muscles, and running out of fundamental recruiting to very advanced strength moves.
The training system contains ten exercise menus, each employing a single piece of training devices. A menu contains three to four exercises, which between them target most trunk and pelvic muscles. Some of the exercises include immunity, some weightlifting, some are just about muscle recruiting. Within a menu that the difficulty of exercises fluctuates; a couple of the menus are very advanced (and consequently not within the competence of all readers). Trainers, therapists and people should set the amount of sets and repetitions for each exercise according to the standard principles of training overload and fatigue. If you're in doubt about how many sets and repetitions you should be performing, consult a qualified coach or (if recovering from injury) a sports therapist, so that you aren't functioning pointlessly or, worse, unsafely.
Select the most appropriate menus, and then use them in rotation. If you're utilizing eight menus and performing four components of core training each week, over the span of a fortnight that you will perform each menu after. This will ensure that you operate each of the muscles in a variety of ways, using different pieces of equipment.
Menu 1: Floor, Static
Menu rationale
To develop a basic level of lumbar and pelvic stability, working front, rear and side muscles of the trunk. This menu can also be used as a maintenance dose of training for intermediate to advanced level athletes.
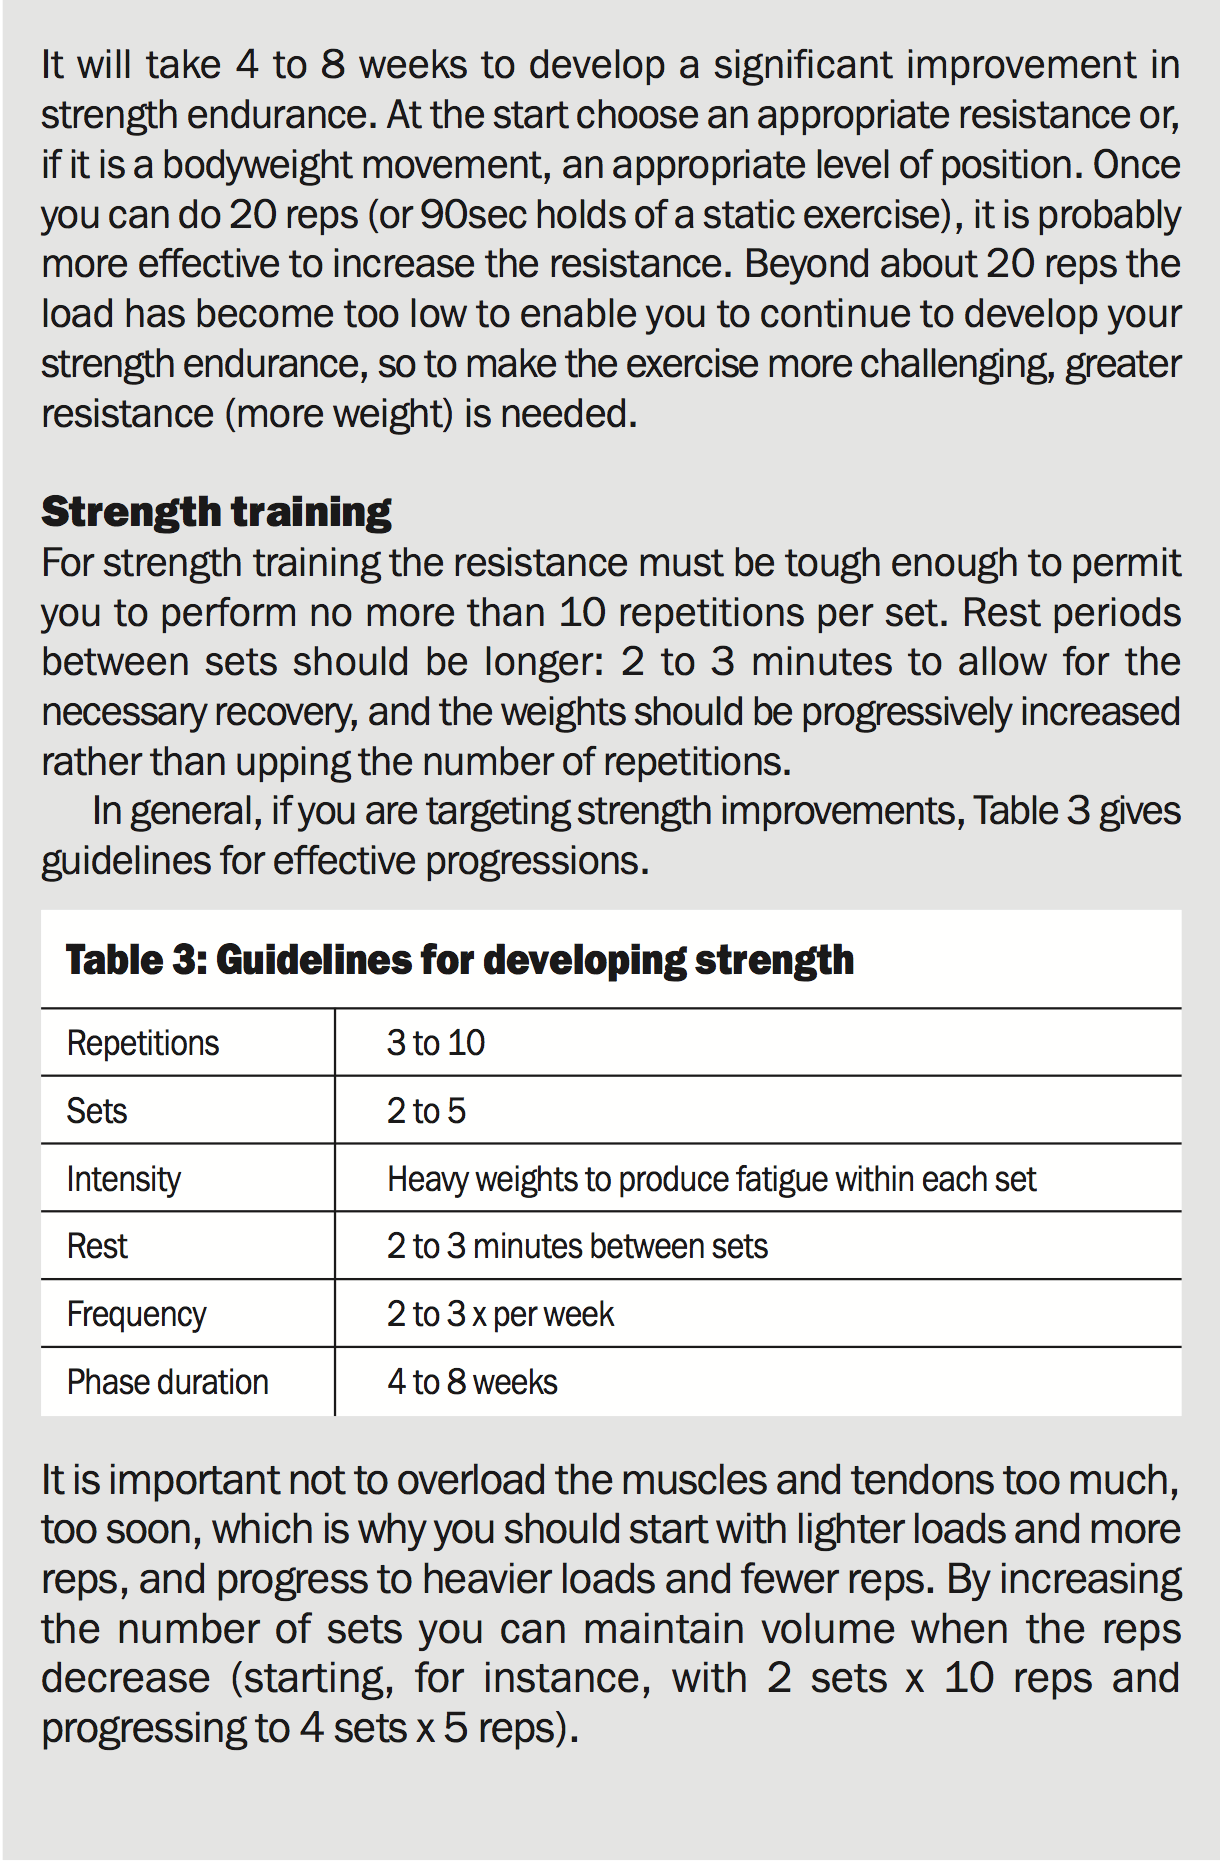
The Plank
Overview: A common exercise that requires good abdominal strength and co-contraction of the abdominal wall musculature to hold the lumbar spine and pelvis in correct alignment.
Level: Basic/intermediate
Muscles targeted: Rectus abdominis Abdominal wall (transversus abdominis/internal obliques)
Technique: Hold a straight body position, supported on elbows and toes. Brace the abs, and set the low back in the neutral position, once you are up. Sometimes this requires a pelvic tilt to find the right position. The aim is to hold this position, keeping the upper spine extended, for an increasing length of time up to a maximum of 60 secs. Perform 2 to 3 sets. Keep shoulders back and chest out while maintaining the neutral lumbar position. This makes the exercise considerably more challenging.
Progression: Lift one leg just off the floor; hold the position without tilting at the pelvis.
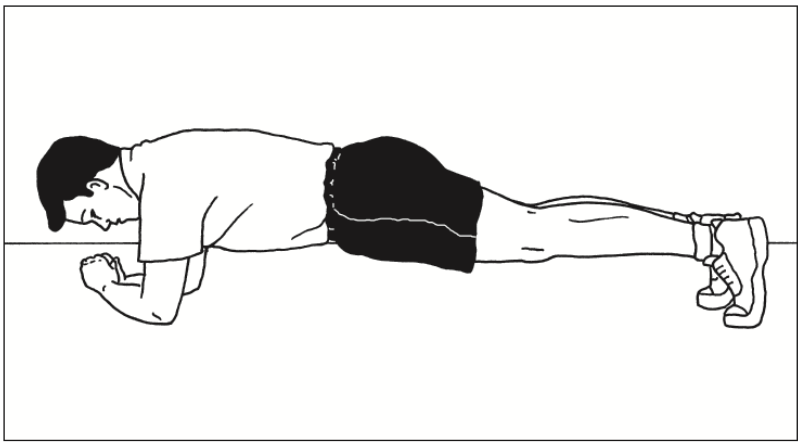
The Side Plank
Overview: Recommended as a safe and effective exercise for the obliques and quadratus lumborum (a key lumbar stabilizing muscle). Recent research also shows this to be an excellent exercise for the lower abdominal muscles.
Level: Basic/intermediate
Muscles targeted: Obliques (internal and external) Quadratus lumborum Transversus abdominis
Technique: Lie on one side, ensuring the top hip is ‘stacked’ above the bottom hip. Push up until there is a straight body line through, feet, hips and head. Hold the position, increasing the length of hold up to a maximum of 60 secs. Perform 2 to 3 sets. Keep the elbow under the shoulder to avoid upper body strain. Lower under control and repeat on opposite side.
Progression: Raise the top leg in the air and hold it in that position throughout.
The Gluteal Bridge
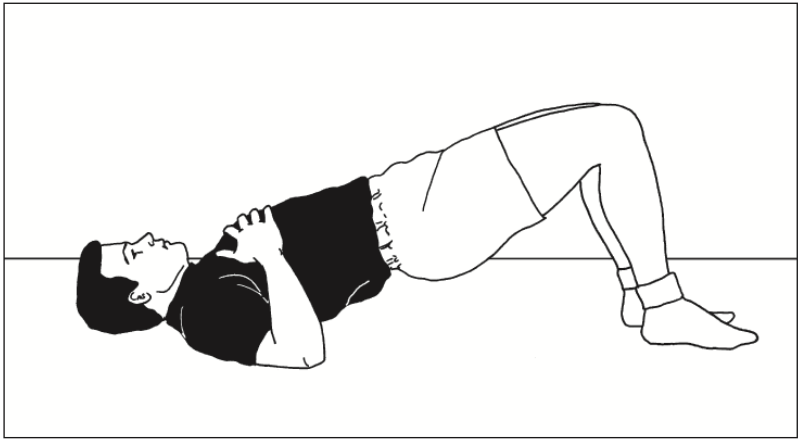
Overview: Research suggests this is more a low-back than gluteal exercise. However, it is a good way to learn how to recruit the gluteals (buttock muscles) in the ‘inner range’ position.
Level : Basic
Muscles targeted: Gluteus maximus Erector spinae/multifidus
Technique: Lie on the floor with your knees bent. Squeeze your gluteals and then push your hips up until there is a straight line through knee and hip to upper body. Shoulders remain on the floor. Beware of raising too high or of flaring the ribs, which pushes the back into hyperextension. Hold the position. Start with 5 sets of 10 sec holds, progressing to 2 to 3 sets of 60 sec holds.
Progression: Extend one leg carefully ahead of you, and hold the position without dropping or tilting the pelvis.
‘Birddog’ Or ‘Superman’
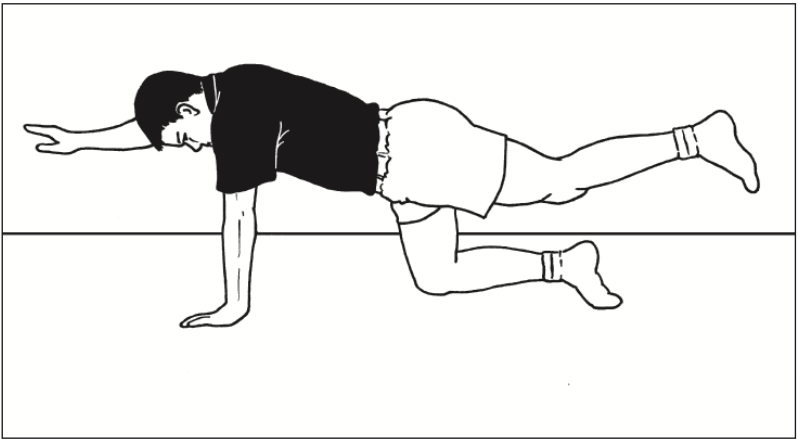
Overview: Recommended as a safe and effective exercise for the lumbar and thoracic portions of the erector spinae (long back) muscle. This exercise also requires co-contraction of the abdominal wall muscles to stabilize the pelvis.
Level: Basic/intermediate
Muscles targeted: Thoracic and lumbar portions of erector spinae
Technique: Start with hands below shoulders and knees below hips. Set your low back into neutral and brace your abs slightly. Slowly slide back one leg and slide forward the opposite arm. Ensure that the back does not slip into extension, and that the shoulders and pelvis do not tilt sideways. Hold, increasing the duration up to a maximum of 20 secs. Slowly bring your leg and arm back and swap sides. Perform sets of 5 to 10, alternating sides after each hold.
Progression: none.
Menu 2: Floor, Dynamic
Menu rationale
To develop a good level of strength endurance in the major trunk muscles. Overall the level of these exercises is intermediate to advanced.
Active Straight Leg Raise
Overview: Requires a strong static contraction of the abdominals to stabilize the lumbar spine against the load of the legs. It also requires good active range of motion of the hamstrings.
Level: intermediate/advanced
Muscles targeted: Rectus abdominis Abdominal wall hip flexors
Technique: Lie on your back with knees bent. Set your lumbar spine in neutral and brace the abs. Lift one leg up straight in the air, ensure your back does not move. Lift the other leg up, again keeping your back in place. (If the back cannot be stabilized during this movement, the exercise is too advanced, and more static transversus stability control work will be needed first.)
Keeping one leg in the air, slowly lower the other down to the floor. Only go as far as you can, until you feel the lumbar spine start to move. Placing your fingers under your back will help you to gauge when this happens. Keep bracing the abs and then lift the leg slowly back up. Repeat with the other leg.
Perform sets of 5 to 10 reps, alternating legs.
Progression: Lower and raise both legs together
Oblique Crunch
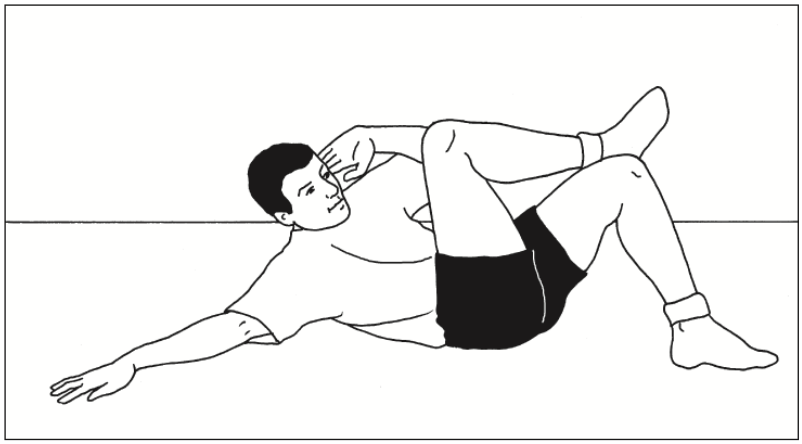
Overview: A good exercise for both the obliques and the abdominals.
Level: Intermediate
Muscles targeted: Rectus abdominis Obliques
Technique: Lie on your back with right ankle resting on left knee. Right arm is placed on the floor out to the side. Keeping the right shoulder down, curl the left shoulder up to the right knee. Crunch at the top and return slowly, under control. Perform sets of 15 to 30 reps on each side in turn. Avoid ‘head nodding’ during the movement: keep head off the floor and look forward throughout.
Progression: Hold a dumb-bell in the hand by your head. Keep arm still so you are forced to raise the dumbell using your abs and not your arm.
Side Lying Hip Abduction

Overview: This is an exercise to isolate the use of gluteus medius (upper buttock). Strength in this muscle group has been shown to be useful in preventing lower limb injuries in female athletes.
Level: Basic Muscles targeted: Gluteus medius
Technique: Lie on your side and set pelvis so your top hip is stacked above lower hip. Roll shoulders forward a little and brace the abs to control pelvic position. Lift the top leg slowly up and down, without hitching at the hip. Perform sets of 20 to 30 reps, each side in turn.
Progression: Weight the top leg with an ankle weight or tie a resistance band between your ankles and pull the band apart as you lift the leg.
Lying Windscreen Wipers
Overview: An advanced active mobility exercise working the obliques and trunk rotation.
Level: Advanced
Muscles targeted: Rectus abdominis Obliques
Technique: Lie on your back with arms out to the sides. Lift legs straight up in the air until the hip is at 90 degrees. Set the lumbar spine in neutral and aim to keep it set throughout. Keeping legs straight and maintaining hip angle, move the legs to one side, controlling any movement in the trunk. Go as far as you can in control, keeping your upper back and shoulders on the floor. Bring the legs to a halt, pull them back up to the start position and then over to the other side, under control. The slow side-to- side movement is like a ‘windscreen wiper’ arc.
Menu 3: Swiss Ball, Static
The four exercises in this routine challenge your ability to hold good posture and pelvic alignment against both bodyweight and the instability of the Swiss ball. The positions of the holds are similar to the static floor exercises in Menu 1, except that they are performed on the ball. Research shows that the performance of core exercises upon the labile surface of the Swiss ball can increase the levels of trunk muscle activation; so this menu is a progression from floor-based work. Overall Menu 3 is intermediate in difficulty.
Swiss Ball Sit & Leg Lift
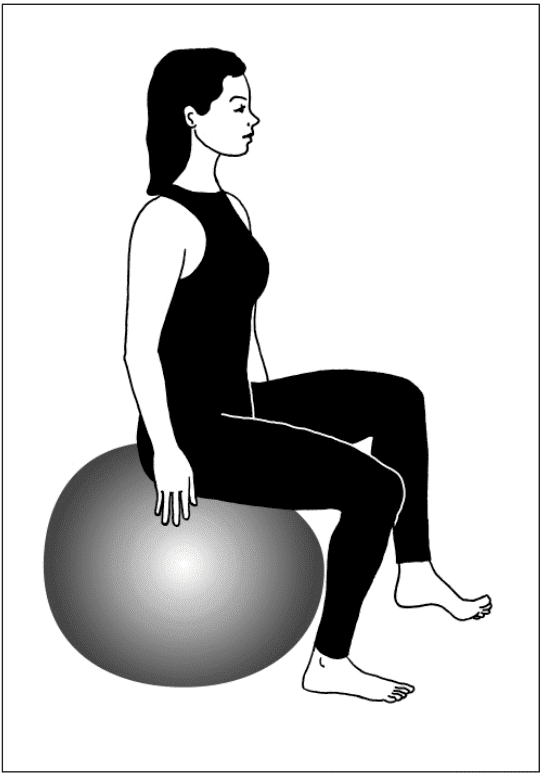
Overview: Challenges your ability to co-contract the abdominal wall and maintain a neutral lumbar spine position on an unstable seat.
Level: Basic
Muscles targeted: Abdominal wall (transversus abdominis, internal obliques)
Technique: Sit on a Swiss ball with hips on the top of the ball and feet hip-width apart. Ensure the size of ball is correct: your knees should be level with or slightly lower than your hips and at 90 degrees in sitting.
Relax and find a neutral lumbar spine position. Set this position by lightly bracing your abdominal muscles. Think about good upper back and shoulder posture as you sit (stomach in, chest lifted, shoulders low and relaxed). It is important to hold an upright sitting position – not leaning forward or back.
Once you are set, carefully lift one foot a few centimeters off the floor. Maintain your balance, lumbar and pelvic alignments as you hold the position on one leg.
Hold for a count of 5 to 10, maintaining form. Perform 5 reps each side.
Progression: Keeping the lifted foot only just off the floor, straighten the leg in front of you, stretching the hamstring. Resist any tilting of your pelvis as the leg straightens by keeping a good hold of the abdominals and maintaining posture against the stretch.
Supine Swiss Ball Bridge
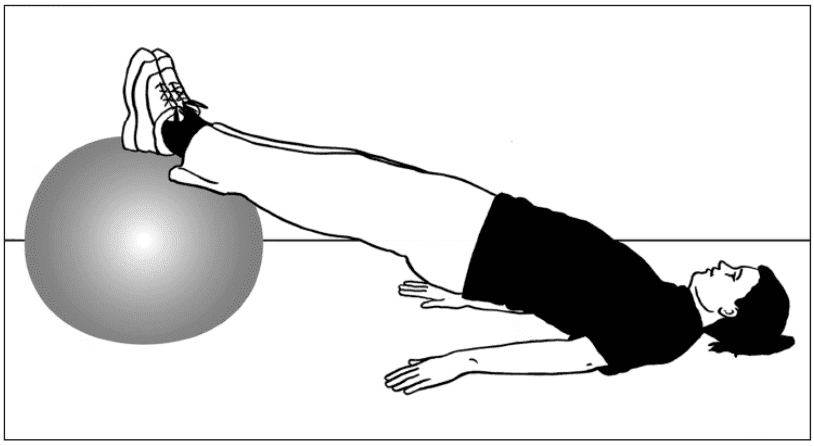
Overview: A posterior-chain exercise (hamstrings, gluteals and back), where the aim is to hold perfectly straight hip and back alignment against the load of your bodyweight and the instability of the ball. A big co-contraction of the trunk muscles is required to perform this exercise well.
Level: Intermediate
Muscles targeted: Gluteals Hamstrings Erector spinae Abdominals Obliques
Technique: Lie on your back with heels on the top of the Swiss ball, hip-width apart to aid stability. Suck in the abs and squeeze up from your gluteals, lifting your hips until there is a straight line from heels to upper back. Shoulders and head stay firmly on the floor. Take care not to lift the hips too high or flare the ribs so that your back hyperextends.
Hold for 30 seconds and lower under control. Perform 2 to 3 sets.
Progression:
i. Place the feet close together on the ball to increase the balance challenge as you lift your hips.
ii. Roll your legs slowly from side to side with control, keeping hips up for an advanced level of challenge.
Swiss Ball Gluteal Bridge
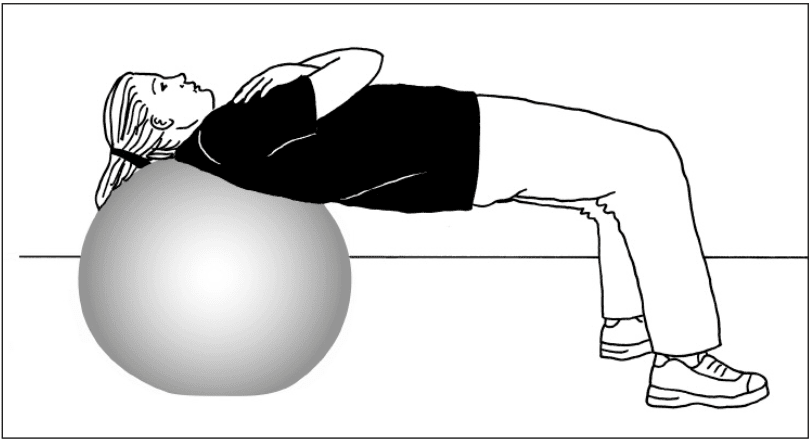
Overview: A second posterior-chain exercise. But with the knees bent and the weight bearing down through the feet, the work is felt mainly in the gluteal muscles
Level: Intermediate
Muscles targeted: Gluteals Erector spinae Abdominals Obliques
Technique: Lie on your back with your shoulders and head on the top of a Swiss ball; feet on the ground, hip-width apart for stability.
Squeezing up from the gluteals, lift hips until there is a straight line running through the knees, hips and shoulders. Do not lift the hips too high or flare the ribs so that your back hyperextends.
Hold for 30 seconds and lower under control. Perform 2 to 3 sets.
Progression:
i. Place the feet close together to increase the balance challenge.
ii. Single-leg bridge, alternating legs with 5 second holds, is an advanced challenge.
Swiss Ball Plank
Overview: A challenging strength exercise for abdominals, focusing on maintaining good alignment of the spine.
Level: Intermediate to advanced
Muscles targeted: Abdominals
Technique: Kneel in front of the Swiss ball and place elbows on the top of the ball in the center. Slowly roll the ball away from your body until there is a straight line through knees, hips and head and your weight is being supported through your elbows down on to the ball.
Once in this position it may be necessary to tilt the pelvis so that it is held in neutral with correct lumbar spine alignment. Also be careful not to round off the shoulders: aim for a ‘long spine’. The better your spinal alignment, the harder the work for the abdominals. If the main pressure is felt in the low back, either your alignment is incorrect or you have insufficient abdominal strength-endurance to hold the correct line.
Hold at the far point for 30 to 60 secs with good form. Perform 2 to 3 sets.
Progression: Move the ball around, forward, left and right with your upper body whilst keeping your hips in place and your head still in its alignment.
Menu 4: Swiss Ball, Dynamic
These exercises challenge trunk strength. The use of the Swiss ball both increases the difficulty because of the instability, and allows you to work through useful ranges of movement. This menu targets the front, back and side of the trunk musculature at intermediate to advanced level.
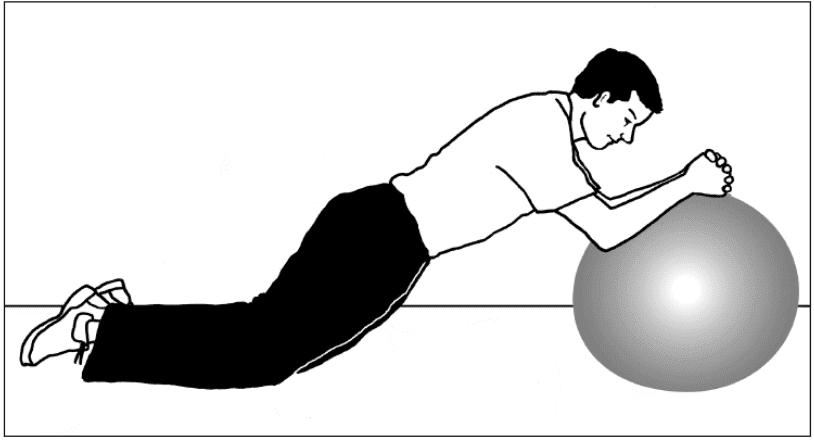
Swiss Ball Back Extension
Overview: The use of the ball for this exercise allows the movement to isolate back extension without hip extension; and to co-ordinate upper back extension with lumbar extension.
Level: Intermediate
Muscles targeted: Erector spinae (lumbar and thoracic portions)
Technique: Kneel over a Swiss ball with thighs and stomach in contact with the ball and head and shoulders dipping over the front of the ball. With your back straight and parallel to the floor, position the lumbar spine in neutral and then set your hips so they do not move.
Allow the chest to drop and fall over the ball, flexing the upper back. Place your hands at the sides of the head, elbows bent. From this position, lift your chest up, extending your upper back until it is higher than at the starting position. Maintain abdominal contraction throughout to fix the hips and limit hyperextension of the lumbar spine.
Perform 10 reps under control, increasing to 20 reps; 2 to 3 sets.
Progression: Add a light dumb-bell held behind the head for extra resistance.
Swiss Ball Overhead Pulls

Overview: The use of the ball for this exercise allows full extension of the body. The abdominals have to work hard to support the spine as the arms extend and pull back. Very good for shoulder stability.
Level: Intermediate to advanced
Muscles targeted: Abdominals, Latissimus dorsi, Pectorals, Scapular stability muscles
Technique: Start in the press-up position with your shins on the ball and hands shoulder width apart under shoulders. Place knees apart slightly for stability. Set lumbar spine in neutral and ensure that the shoulders are stable with shoulder blades down and chest out.
Roll backwards until your hands are above your head, maintaining straight body position and neutral low back. Use your abs, ensuring your hips do not drop. Brace your abs and pull yourself forwards to return to the start position.
Perform 5 reps with good form, increasing to 10 reps; 2 to 3 sets.
Progression: Lengthen your bridge position by starting with feet alone on the ball. The abs have to support more bodyweight.
Swiss Ball Squat Thrust

Overview: The old-school exercise transposed to the ball. This allows for a focus on the flexion of the hips and low back, maximizing the use of abs. Holding the position through several reps is a great strength-endurance challenge for the abdominals. Unlike the traditional version where speed is of the essence, the Swiss ball version is more demanding if performed slowly with control.
Level: Intermediate
Muscles targeted: Abdominals
Technique: Start in the press-up position with shins on the ball, hands shoulder-width apart under the shoulders. Place knees slightly apart for stability. Set lumbar spine in neutral and ensure shoulders are stable with shoulder blades down and chest out.
Pull knees to your chest and crunch the abs to get an extra flex of the hips and back. Slowly extend knees back, using your abs to prevent the hips dropping down.
Perform 10 reps slowly, increasing to 20 reps; 2 to 3 sets.
Progression: Perform the squat thrust and the overhead pull as a combination exercise.
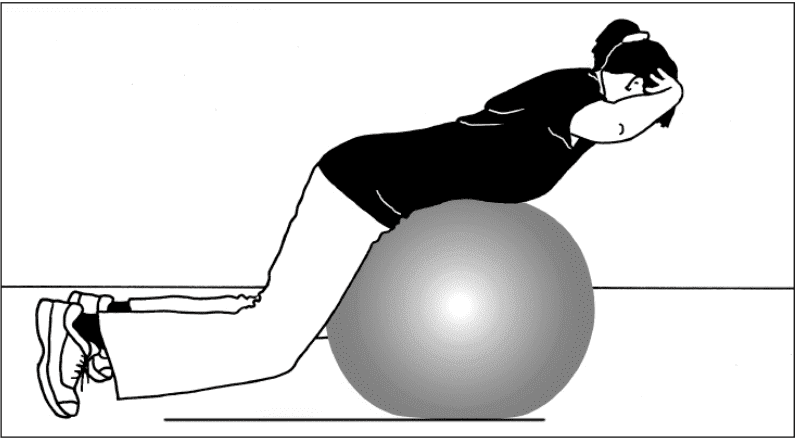
Swiss Ball Side Crunch
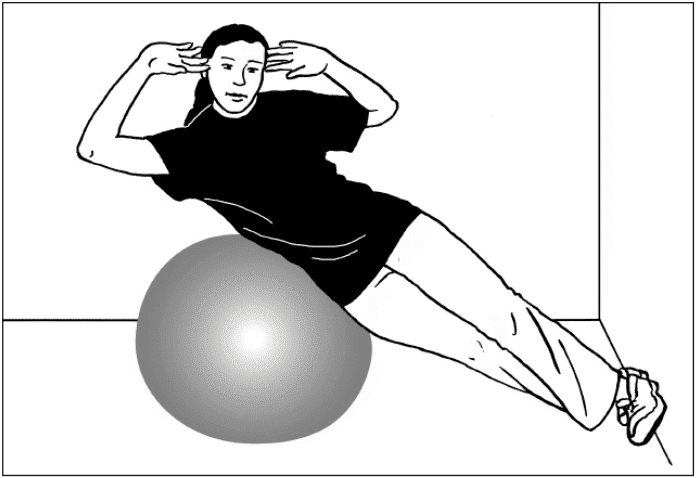
Overview: An excellent exercise for the obliques. The Swiss ball simply replaces the need for a frame or partner support for your legs. Electromyography research has shown this exercise delivers high recruitment levels of the obliques.
Level: Intermediate
Muscles targeted: Obliques
Technique: Position your- self sideways on the ball, balanced on lower hip with top hip stacked vertically. Brace feet against a wall, one slightly in front of the other for stability. Ensure a straight line through legs, hips and shoulders. Place your hands, elbows bent, by your head.
Lift upper body up away from the ball, crunching sideways towards your feet and focusing upon your oblique muscles. Slowly return, under control.
Perform 10 reps, increasing to 20 reps; 2 to 3 sets.
Progression: Hold a weight across your chest to increase the load.
Menu 5: Pulley, Kneeling
Bodyweight-only exercises by definition have strict limits on your ability to increase the load against which the muscles are working. So the main tool for progression is to increase the number of sets and reps being performed, which is good for muscular endurance, but not for pure strength.
The pulley system allows us to treat trunk training like limb training, working at higher resistance levels as your strength improves. Overall, these exercises are advanced.
Chop Rotation
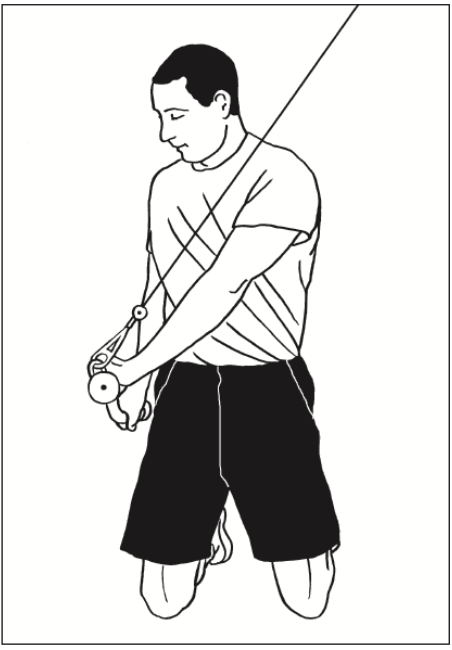
Overview: Excellent for dynamic trunk rotation strength co- ordinated with the upper body. This exercise and its pair are functional to many sporting and daily life movements. When performed in the kneeling position, the exercise requires dissociation between the pelvis and shoulder rotation, which is a great stability challenge.
Level: Advanced
Muscles targeted: Abdominals Obliques (Plus upper body)
Technique: Kneel, facing forwards, by the side of the pulley column. Handle attachment is set at (standing) head height. Fix the hips square to the front and set your lumbar spine in neutral. Twisting through the waist, turn shoulders towards the pulley column and grasp the handle with both hands. Pull down on the handle, rotating your shoulders away from the column and crunching down. Finish with hands by your hips and shoulders facing away. Hips remain square to the front throughout the movement.
Perform 8 to 10 reps; 2 to 3 sets each side.
Progression: Increase the weight, keeping to sets of 8 to 10 reps.
Lift Rotation
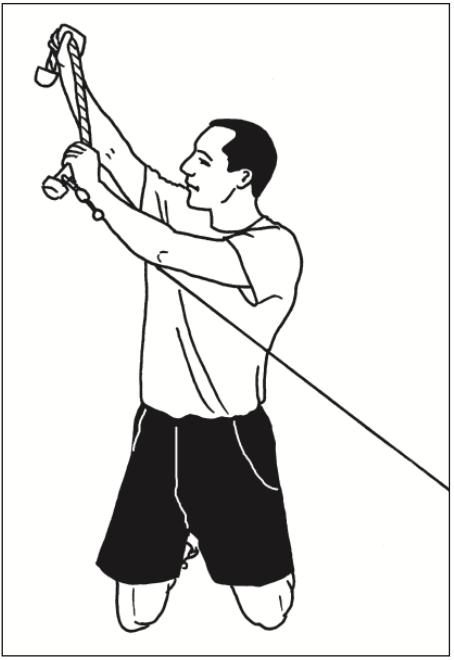
Overview: The natural opposite to the chop movement exercise. Perform these two as a pair to ensure balanced development of trunk rotation strength. The lift movement requires co-contraction of the low back muscles with the obliques to produce the rotation.
Level: Advanced
Muscles targeted: Erector spinae Obliques (Plus upper body)
Technique: Kneel, facing forwards, by the side of the pulley column. Handle attachment is set just below (kneeling) hip height. Fix hips square to the front and set your lumbar spine in neutral. Twisting through the waist, turn shoulders towards the pulley column and grasp the handle with both hands. Pull up on the handle, rotating the shoulders away. Finish with hands above your head and shoulders facing away from the column. Hips remain square to the front throughout.
Perform 8 to 10 reps; 2 to 3 sets each side.
Progression: Increase the weight, keeping to sets of 8 to 10 reps.
Pulley Crunch
Overview: This is a pure trunk flexion movement targeting the development of abdominal strength. The use of the weights allows for high resistances. Care must be taken to fix the hips throughout the exercise, otherwise the hip flexors will contribute, significantly reducing the training effect on the abdominals.
Level: Advanced
Muscles targeted: Abdominals
Technique: Kneel with back to the pulley column, holding a rope attachment with each hand around your neck. Start with hips fully extended (ie, kneeling fully upright) and pelvis set in neutral. Shoulders, hips and knees should all be in line and upright.
Focusing on the abs, crunch down, pulling the weight and flexing your trunk forward. The arms simply hold on – avoid using them to assist in pulling the weight. Ensure the pelvis remains set and stable throughout: all the movement comes from the spine flexion, so there should be no hip flexion, forward lean or forwards pelvic tilt.
Perform 5 to 10 reps; 2 to 3 sets.
Progression: Increase the weight, keeping to sets of 5 to 10 reps.
The information contained in this publication is believed to be correct at the time of going to press. Whilst care has been taken to ensure that the information is accurate, the publisher can accept no responsibility for the consequences of actions based on the advice contained herein.
