


In the second part on the managing of syndesmosis injuries, El Paso, chiropractor Dr. Alexander Jimenez summarizes the management principles and therapy choices.
Management Of Syndesmosis Injuries
The aim of syndesmosis injury management that is successful, whether conservative or operative, would be to revive and maintain the normal relationship between tibia and the fibula and also to allow healing of the soft tissue structures of the syndesmosis.Conservative
Cryotherapy
Medications
As due to the secure status of the athlete pain can be prevented, simple analgesics will be sufficient to settle a number of the pain connected with syndesmosis injuries. It is crucial as it has been shown to have effects on healing, to prevent NSAIDS. If needed, NSAIDS are used later in the rehab process if persistent synovitis is current.Immobilisation
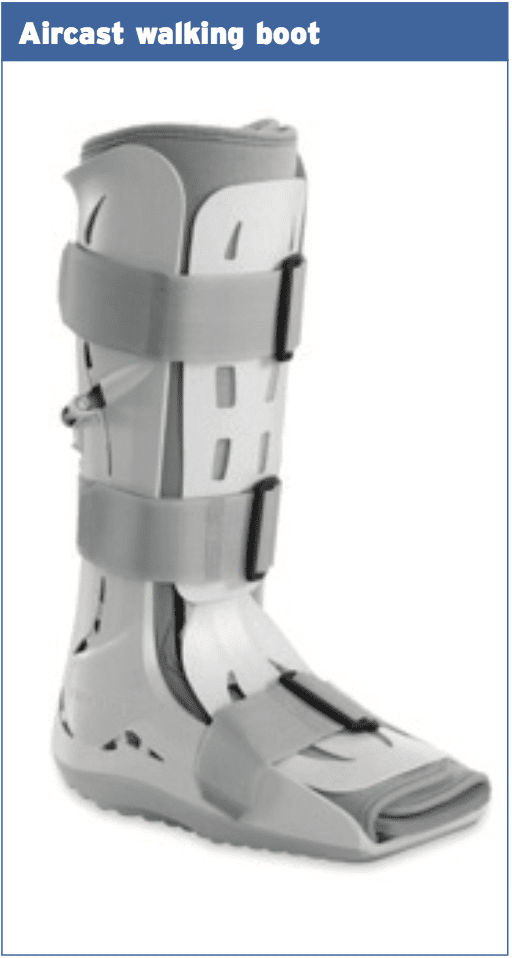
If definite injury to the AITFL has happened Grade 1 injuries are often accidents.This type of injury is usually immobilised in a walking boot and weight- bearing on crutches for the week period and then reassessed. If the athlete is able to comfortably weight endure at 1 or two weeks with no boot, then they may be placed in an aircast splint (operational splint) and allowed to FWB using splint for seven days.
When dysfunction and pain persists after the initial 1-2 week period, then the boot is employed with gradually and reassessed. Grade 1 accidents and steady Grade 2 injuries ought to have the ability to weight-bear at four weeks post-injury. Then surgical inspection will be essential in the event the athlete struggles to take fat through the ankle in four months post-op. The threat with is that if the AITFL tightened and has not adequately cured then the fibula will be pushed apart by the talus and tibia and uncertainty may grow.
Active Therapy
The boot can be eliminated into ranges as well as small and isometric range strengthening with a theraband for continuing icing of the gentle and ankle selection of movement after day 7. Soft tissue work to the nerves and other calf muscles can begin to keep tissue compliance.Use caution in the early stages of recovery when recovering range of motion of the ankle. A dorsiflexion position is created by stretching the calf muscles or Achilles tendon in a position posture and this can cause gapping at the joint that is injured. Also, be careful to avoid motions that put the foot into an upward and outward position since this replicates that were probably the position the foot has been forced into once the injury occurred.
After the boot is removed and the athlete is totally weight-bearing, then guide rehabilitation work can begin on proprioception leg power and cross training into jogging. (See below under surgical management for logical rehabilitation progressions post-boot removal.) Be aware that the progression for a non- managed syndesmosis will be listed for the surgically- handled injuries.
Functional Sports-Specific Rehabilitation
Functional sports specific rehab starts usually at first post- injury in level 1 accidents, if dysfunction and pain persist, but this can be delayed. What's apparent and must be hauled lateral ligament sprains that are standard prior to is that the time for healing for stable grade 1 injuries will be more than high level standard ligament injuries. The nature of this syndesmosis has to be appropriate and respected time allocated to permit for recovery. For instance, Silvestri et al (2002) found that within a four-year period, 14 syndesmosis injuries occurred in the NCAA Football Division 1 which required period of immobilization and rehabilitation. Full participation in football resumed 31 +/- 11 days post injury (20-42 days) for stable grade 1 injuries(1).It's also the view of this author that a lot of the research on syndesmosis injuries was presented in the context of sports like soccer, skiing and hockey. In sports that require significant ankle loading and repetitive twisting and turning movements under additional load, such as NFL and rugby, the return to play time for conservatively controlled grade 1 and minor grade 2 accidents can stretch to 8-10 weeks with less of a probability of re-injury. Some authors indicate that harms can be back to game in as few as 3-4 weeks, however level grade 1 injuries seem to have difficulty in returning to perform at 3-4 weeks post-injury in the contact arena. Therefore expect the staged hints below and also the rehabilitation to be protracted in NFL players and high level rugby.
Other Considerations
1. Fibular fracture. This guarantees that an eight-week rehab period will be required to allow full bone healing. This enables a longer margin for recovery in the syndesmosis injuries that are stable.2. Flexor Hallucis Longus (FHL) tendon. This tendon and its sheath pass close to the posterior talocrural and subtalar joints. The FHL may be hurt concurrently with the syndesmosis as mechanism for injury usually involves dorsiflexion with rotation. This can act as a long- term pain generator.
3. Subtalar joint. Together with the mechanism of injury to the syndesmosis, the subtalar joint may be sheared and suffer an injury. This will create posterior foot pain on induced plantar- flexion.
4. Injury to the midfoot. The forced mechanism to injure the ankle can injure the midfoot. As the focus might be directed to the ankle the athlete might not notice this pain; however, it might present down the rehabilitation line when the athlete starts to weight-bear.
5. Talocrural arthritis. Ramsey and Hamilton (1976) revealed that even a 1mm displacement of the talus within the mortise can decrease the contact area in the talocrural joint by 42 percent (two). In misman- elderly injuries that result in an excessive quantity of opening, this may lead to premature onset arthritic changes.
Surgical
The key to managing syndesmosis injuries will be to attain reduction and fixation of the distal tibiofibular joint. This allows healing of those ligaments that are involved and restores stability and the congruency of the syndesmosis. If left untreated, latent diastasis (separation), chronic instability, ongoing pain, osteochondral lesions or arthritic changes may grow.The signs to surgically repair the syndesmosis contain:
1. Frank diastasis
2. Diastasis on anxiety x-ray
3. Fibular fracture 4.5mm above ankle joint.
Trans-syndesmotic fixation may be single device or multiple device and also the amount of cortices used in fixation (tricortical or quadricortical) will vary between surgeons. The selection of number of cortices will ascertain the accessible allowable assortment of external tibial rotation. If three cortices just engage organic outside rotation of the fibula will occur as the dorsiflexes and result in less screw collapse. It has been implied that any fibula movement may be prevented by fixation and thus may not let normal physiological movement such as dorsiflexion to ever happen.
It isn't the objective of this paper to discuss in detail the various philosophies on stabilization besides to point out that fixation apparatus can and have been taken advantage of. These devices used include:
1. Metal screws 3.5mm, 4mm or 4.5mm
2. 4.0mm cannulated screw
3. Bioabsorbable screws
4. Syndesmotic staple
5. Suture and button
6. Endobutton suture procedure (Tightrope).
7. Syndesmosis hook.
8. Trans-syndesmotic bolt.
9. ANK nail
10. Kirschner wire
11. Assembled bolt-tightrope system (ABTS). This is composed of a nut a button a pre-cut bolt and a wire that is fibre.
Single Screw Fixation
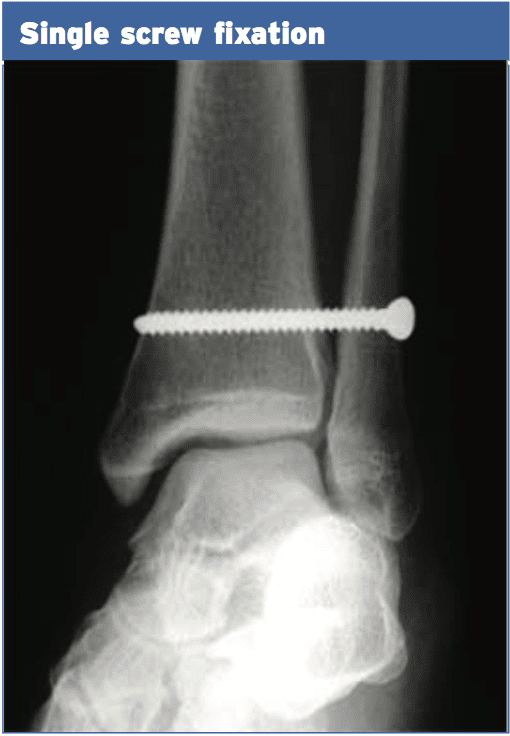
Typically in the past a 3.5mm tricortical screw placed approximately 2cm above the tibial plafond has been used; however, more recently suture-button devices (Tightrope) has been gaining popularity as they enjoy the following benefits:
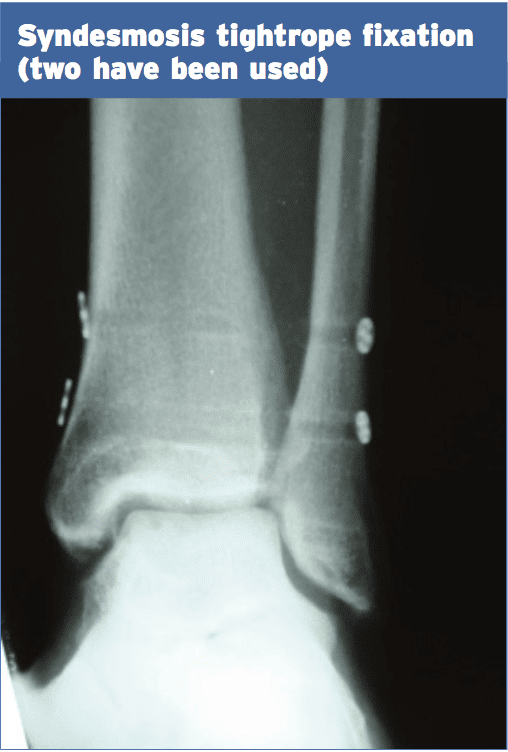
2. Insertion of this tightrope is less invasive
3. Are as powerful as screw fixations
4. Screws have a greater rate of breakage not evident with suture-button
5. Quicker time and return to game
6. Less malreduction in comparison with screws in maintaining the reduction compared with screws, is better
7. No need for surgery to remove screw.
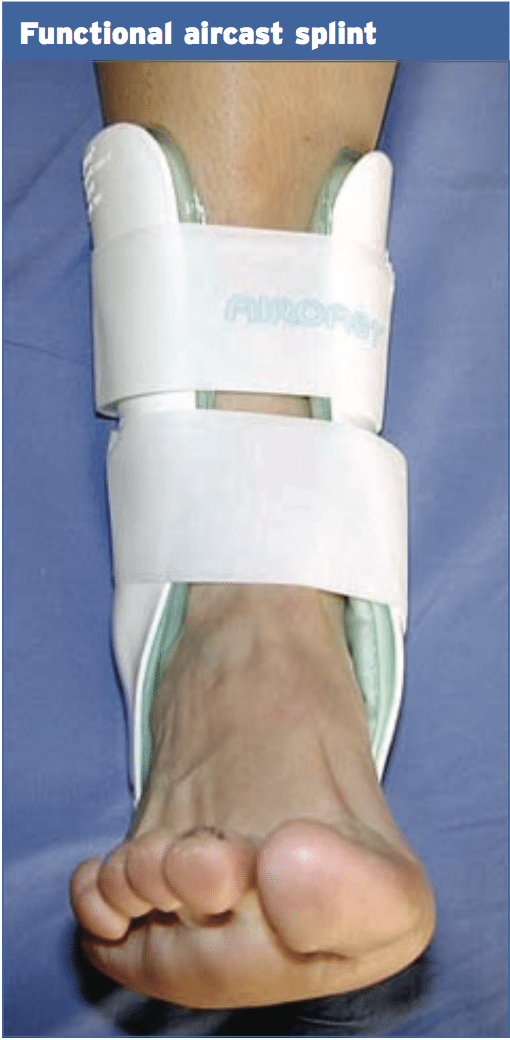
Post-fixation, it is typical for your ankle to be placed in a below-knee back slab for fourteen days and removed to get a below walking boot for 4 months. At 6-8 weeks post op the patient may be readmitted for screw removal when a screw is used (some surgeons prefer to wait until 12 weeks post-op). The stability of the syndesmosis is checked under an image intensifier. If it turns out to be secure the patient is placed in an Aircast walker for 3 months post-screw removal. At this stage a standing mortise x ray is taken to assess of any diastasis of the joint.
Post-Operative Management
(first 6-8 weeks)1. Normal icing in altitude (allow ankle to rest in neutral position). This is sometimes carried out with a CryoCuff apparatus or a Game Ready apparatus.
2. Gentle tissue massage into calves anterior, peroneals and rectal calves. This won't be possible for the first two weeks post-op due to sutures and dressings.
3. Gentle theraband isometric exercises.
4. High-volume proximal hip (gluteals, adductors knee and knee stabilizers commence within this stage.
5. If a screw has been inserted for this to be removed, and the plan is this needs to be carried out as soon as the boot is removed by the athlete. Stage 2 below can begin with screw thread in situ and then ceased for a week post-screw elimination and then continued if, however, there's a delay in screw removal.
6. It's common to have repeat to love post- surgical stability.
7. Then the athlete is encouraged to in the boot and on crutches if x-rays prove stability and this may be progressed at three months to complete weight-bearing if pain allows.
8. It's normal for the athlete to capable to fully and at a boot in six weeks post-op.
Post-Operative Management
(6/8-12/14 months)1. This stage starts at week six for a suture- switch (Tightrope) fixation and after the screw was removed in a screw fixation.
2. Joint mobilisations into talocrural joint and subtalar joint to boost dorsiflexion ROM. Aim for 75% ROM compared to other side as measured on a knee to wall test. The syndesmosis does not ever reach the same dorsiflexion ROM as pre- harm.
3. Subsequently and passive stretch of soleus employing a towel stretch originally progress in standing and to seated dorsiflexion stretch and/or lunge at 10 weeks.
4. Through-range theraband exercises from week 6 and quickly progress to calf raises over the floor to recover calf power quickly.
5. Toe walks -- forwards, backwards, side- ways. These will progress calf strength without producing the dorsiflexion positions that are painful.
6. Continue hip-based strength exercises with therabands in standing and variations of hip bridges etc..
7. If standing proprioception is uneasy this is sometimes done sitting on a BAPS board.
8. Start single-leg proprioception holds on wobble board, Dura-disc, BOSU ball. Two hand support may be necessary initially for comfort; however, this can be progressed to free standing quickly. Attempt a large variety of ‘static’ proprioception exercises in the first three weeks post-screw removal/boot removal. A static proprioception exercise consists of exercises whereby the foot does not leave the surface.
9. From week 9 post-op it's safe to commence 'lively' proprioception exercises like ran and stop drills on a mini tramp, jumps onto a BOSU ball.
10. Check SEBT (see below) in 8/10/12 weeks ).
11. Start simple bicycle, upper body cross training and water flowing. Swimming can commence when the ankle can tolerate kicking.
12. Posterior chain strengthening between no dorsiflexion Nordics, such as thrusters Bulgarians.
13. If Alta G available after walking at 50% bodyweight could commence and progressed each session based on response to the session. Start with BW and progress.
The usual rehabilitation stages for a repair that is syndesmosis are often phases rather than based on criteria. As an alternative, Jelinek and Porter (2012) offer a practical criteria for return to conducting(3). Then move on to the phase, when a stage is completed. Stage 2 can be commenced in by the phases when the athlete gets the boot eliminated or has recovered in the screw removal.
1. Hell raises x 10
2. Walk at face speed -- 50 yards
3. Jumping on the two legs 10 days
4. Jumping 10 times
5. Jog straight 50 yards
6. Jog and curves 2 laps
7. Sprint three quarters half and complete speed
8. Run figure 8s
9. Cariocas (cross overs) 40 yards -- both instructions
10. Backward running -- 40 yards
11. Cutting -- 50 percent, 75%
12. Position drills
Post-Operative Management
(Weeks 12/14+)1. From week 12 the athlete is able to safely start running. This will be dependent on the functional condition of the lower leg system in the 12 weeks stage (that may have started earlier in an Alta G if available). If atrophy of these calves has happened, then conducting may be delayed for 2 weeks to allow more time for calf specific work to occur. The ankle is very stiff into dorsiflexion then running until ROM is improved may be delayed.
2. After the athlete can comfortably run at high-speed amounts on the treadmill in periods sets (eg 18kph for guys, 15 kph for Girls), attempt running at slower speeds on a five-degree incline.
3. Treadmill running rate to be objectively controlled at the first couple weeks of running and may start at week 12 if a treadmill can be obtained, as this lets the space. When the athlete is comfortable running at high levels on the treadmill and inclines can be tolerated by them at slower speeds they could progress their running exercises.
4. . Begin with speed and mechanisms repeats. If the athlete has progressed from 18-20 kph on the treadmill they could start at high speed with on-field running. Time frames that are usual are that an athlete should be sprinting off, 16 weeks.
5. High level calf lift complex collections, jump- ping and lively calf-type exercises (push press )) can start from week 12.
6. Proceed and advancement proprioception drills that are lively and proprioception. Box with hop drills, higher level jumps ladder exercises could be improved at this stage. The problem with dynamic drills parallels the growth.
7. After the athlete has achieved close to maximum speeds in straight line 21, drill begin and the athlete has improved through high level proprioception drills.
8. It is typical for athletes to return with some form of bracing or robust strapping for a complete season post-recovery.
Proprioception Training
Proprioception training has been covered in previous texts and Sports Injury Bulletin articles. However, it may be summarized that proprioception training retrains the three afferent path- ways1. Peripheral mechanoreceptors
2. Vestibular (inner ear) receptors
3. Visual receptors.
The data from these three receptor systems responses and integration between these systems enables correction of position and muscle force and retrains the skill acquisition element of proprioception and balance.
When Can The Athlete Return To Play?
It is important that the athlete, coaches and parents understand that the recovery time is more than a "typical" ankle sprain to ensure time frames for return to play are realistic. Hopkinson et al (1990) say that incomplete syndesmosis injuries may take twice as long as grade 3 high level lateral ligament sprains(4). Specifically, Sman et al (2012) found that on average syndesmosis injury took 85 times and lateral ankle sprains only 21 days to recuperate. The present diagnostic procedure makes it difficult to accurately grade the injury; therefore, time frames are not simple to place (5).The use of regular 'field' tests may provide some advice as to when the athlete is fit to return to play through the use of practical movement displays to the clinician. Sman et al (2012) provide the following as potential screening tests as initial pre- season baselines to compare against future harm, or if baseline testing has not been completed then side-to-side dimensions can be utilized (5);
1. Vertical jump height
2. Star excursion balance evaluation (SEBT) -- see below
3. Jump for distance
4. Heel raise evaluation.
The discovered that vertical jump performance can be good predictors of syndesmosis injury and the jump height correlated with length of recovery.
But research into the efficacy of hop evaluations in knee injuries demonstrates that a requirement is for evaluations when assessing capacity after injury in knee injuries. This rationale can also be used to ankle and lower limb injuries. The Very Best hop tests for evaluating lower limb work are (and also an expected >90% functionality along with other limb is expected):
1. Crossover jump test
2. 6m timed hop test.
Logerstedt et al (2012) found that as a predictor of function in patients who have below normal ranges of knee work are 5 times more likely of having a 6m timed evaluation <88% of the other side and patients with knee function above normal ranges are 4 times more likely to have a crossover hop test that is >95% of another hand (6).
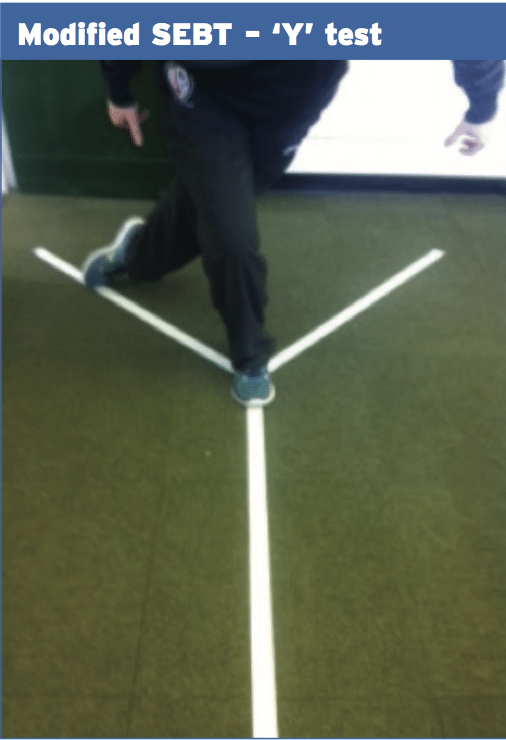
Star Excursion Balance Test
The Star Excursion Balance Test (SEBT) is a dynamic test which needs flexibility, strength, and proprioception. It is a measure of dynamic equilibrium that provides people and athletes that are physically active with a substantial obstacle. The test may be used to assess performance but may also be used to screen deficits in control that was dynamic as a result of musculoskeletal injuries like ankle instability. It may be utilized evaluation to ensure symmetry on the other hand. It has also been demonstrated that the operation of SEBT improves after training (7).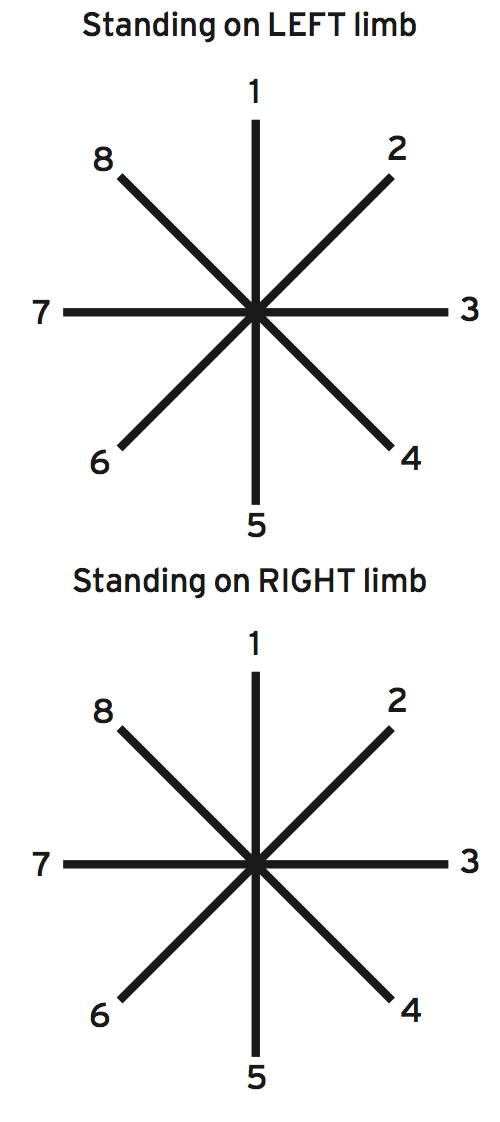
1. Anterior
2. Anteromedial
3. Medial
4. Posteromedial
5. Posterior
6. Posterolateral
7. Lateral
8. Anterolateral
It has been shown that the anterior, posterolateral and posteromedial directions seem to be important to identify people at higher risk of lower extremity injury with athletes and chronic ankle instability. This evaluation can be modified to assess these three motion directions and this has been known as the Y test.
Conclusion
The majority of ankle sprains can be treated with conservative means. It's important to teach coaches parents and the athlete that the recovery period is longer than the typical ankle sprain to avoid unrealistic expectations. Recognition of syndesmotic injuries by physical therapists, athletic trainers and doctors is needed to properly care to avoid problems.References
1.Athletic Therapy Journal. Sept 2002.
2.J Bone and J Surgery Am. 1976. 58(3); 356-357.
3. Foot Ankle Clinic. 2009. 14(2); 277-298.
4. Foot Ankle. 1990. 10(6); 325-330.
5.BJSM.2013. 0; 1-7.
6.American Journal of Sports Med. 2012. 40(10); 2348-2356.
7.J Athletic Training. 2012. 47(3); 339-357.
